stuartpb
-
Posts
326 -
Joined
-
Last visited
-
Days Won
2


-min(1)(1)-min.thumb.jpg.2925e0e5a884e430240a6130eccc4c65.jpg)


stuartpb's Achievements
")
Newbie (1/14)
178
Reputation
-
No worries glad you all got it working :-)
-
If the line is commented out, which it is as in the snippet you provided above, then Jeff must have done step 3 too. I'd suggest asking Jeff as it seems he's made a few mods to the file.
-
That looks like it's parsing the same data as how I done it. The departure airport's lat and long coordinates and the route. I would jump to step 3 and see if the routes show up on the map.
-
I'm running a test flight at the moment, if you want to see the amends in action, go here: http://aroundtheworldclub.co.uk/index.php/acars
-
I had forgot that I made a change to the acarsmap.js file too. Please see amendment on original post. If this still doesn't work for you guys, I'm at a loss as to why not.
-
EDITED ON 20/03/14 - FORGOT ABOUT 3RD FILE AMEND AND ADDED SOME OPTIONAL TWEAKS. If like me, you want to have the route for each live flight shown on the ACARS map, you can make the amendments to three files in order to do so. I've tested this on a custom KACARS install. This will work for scheduled and charter flights as long as a route is entered either in the schedule, or entered into the ACARS program. If a route doesn't exist in the schedule, or one isn't entered in the ACARS program, a straight point to point line will be shown. Files to edit: ​​Make backups of these two files before you proceed!! /core/modules/ACARS/ACARS.php /common/NavData.class.php /lib/js/acarsmap.js Edit Number 1 - ACARS.php Find the following line: $flight->route_details = NavData::parseRoute($flight->route); And replace with: $flight->route_details = NavData::parseRouteACARS($flight); Once you've made the change, save the file and upload to your server, overwriting the existing file. Edit Number 2 - NavData.class.php Find the line that contains this code: return $allpoints; } AFTER the } on a new line, add the following code: public static function parseRouteACARS($flight) { $routeairport = OperationsData::GetAirportInfo($flight->depicao); $fromlat = $routeairport->lat; $fromlng = $routeairport->lng; $route_string = $flight->route; if($route_string == '') { return array(); } // Remove any SID/STAR text $route_string = str_replace('SID', '', $route_string); $route_string = str_replace('STAR', '', $route_string); $navpoints = array(); $all_points = explode(' ', $route_string); foreach($all_points as $key => $value) { if(empty($value) === true) { continue; } $navpoints[] = strtoupper(trim($value)); } $allpoints = array(); $total = count($navpoints); $airways = self::getAirways($navpoints); for($i = 0; $i < $total; $i++) { $name = self::cleanName($navpoints[$i]); /* the current point is an airway, so go through the airway list and add each corresponding point between the entry and exit to the list. */ if(isset($airways[$name])) { $entry_name = self::cleanName($navpoints[$i-1]); $exit_name = self::cleanName($navpoints[$i+1]); $entry = self::getPointIndex($entry_name, $airways[$name]); $exit = self::getPointIndex($exit_name, $airways[$name]); if($entry == -1) { $entry = $exit; } else { /* Add information abotu the entry point in first, if it's valid and exists */ $allpoints[$entry_name] = $airways[$name][$entry]; } if($exit == -1) { continue; } if($entry < $exit) { # Go forwards through the list adding each one for($l=$entry; $l<=$exit; $l++) { $allpoints[$airways[$name][$l]->name] = $airways[$name][$l]; } } elseif($entry > $exit) { # Go backwards through the list for($l=$exit; $l>=$entry; $l--) { $point_name = self::cleanName($airways[$name][$l]->name); $allpoints[$point_name] = $airways[$name][$l]; } } elseif($entry == $exit) { $point_name = self::cleanName($airways[$name][$l]->name); $allpoints[$point_name] = $airways[$name][$entry]; } # Now add the exit point, and increment the main counter by one if($exit > -1) { $allpoints[$exit_name] = $airways[$name][$exit]; } continue; } else { /* This nav point already exists in the list, don't add it again */ if(isset($allpoints[$navpoints[$i]])) { continue; } /* Means it is a track, so go into processing it See if it's something like XXXX/YYYY */ if(substr_count($navpoints[$i], '/') > 0) { $name = $navpoints[$i]; $point_name = explode('/', $name); preg_match(self::$nat_pattern, $point_name[0], $matches); $coord = $matches[1]; $lat = $matches[2].$coord[0].$coord[1].'.'.$coord[2].$coord[3]; /* Match the second set of coordinates */ # Read the second set preg_match(self::$nat_pattern, $point_name[1], $matches); if($matches == 0) { continue; } $coord = $matches[1]; $lng = $matches[2].$coord[0].$coord[1].$coord[2].'.'.$coord[3]; /* Now convert into decimal coordinates */ $coords = $lat.' '.$lng; $coords = Util::get_coordinates($coords); if(empty($coords['lat']) || empty($coords['lng'])) { unset($allpoints[$navpoints[$i]]); continue; } $tmp = new stdClass(); $tmp->id = 0; $tmp->type = NAV_TRACK; $tmp->name = $name; $tmp->title = $name; $tmp->lat = $coords['lat']; $tmp->lng = $coords['lng']; $tmp->airway = ''; $tmp->sequence = 0; $tmp->freq = ''; $allpoints[$navpoints[$i]] = $tmp; unset($point_name); unset($matches); unset($tmp); } else { $allpoints[$navpoints[$i]] = $navpoints[$i]; $navpoint_list[] = $navpoints[$i]; } } } $navpoint_list_details = self::getNavDetails($navpoint_list); foreach($navpoint_list_details as $point => $list) { $allpoints[$point] = $list; } unset($navpoint_list_details); /* How will this work - loop through each point, and decide which one we'll use, determined by the one which is the shortest distance from the previous Go in the order of the ones passed in. */ foreach($allpoints as $point_name => $point_details) { if(is_string($point_details)) { unset($allpoints[$point_name]); continue; } if(!is_array($point_details)) { continue; } $results_count = count($point_details); if($results_count == 1) { $allpoints[$point_name] = $point_details[0]; } elseif($results_count > 1) { /* There is more than one, so find the one with the shortest distance from the previous point out of all the ones */ $index = 0; $dist = 0; /* Set the inital settings */ $lowest_index = 0; $lowest = $point_details[$lowest_index]; $lowest_dist = SchedulesData::distanceBetweenPoints($fromlat, $fromlng, $lowest->lat, $lowest->lng); foreach($point_details as $p) { $dist = SchedulesData::distanceBetweenPoints($fromlat, $fromlng, $p->lat, $p->lng); if($dist < $lowest_dist) { $lowest_index = $index; $lowest_dist = $dist; } $index++; } $allpoints[$point_name] = $point_details[$lowest_index]; } $fromlat = $allpoints[$point_name]->lat; $fromlng = $allpoints[$point_name]->lng; } return $allpoints; } Once you've made the change, save the file and upload to your server, overwriting the existing file. Edit Number 3 - acarsmap.js Open the acarsmap.js file, and find the following code. If you are using the default file, it should be on lines 148 & 149 if(this.flightdetails.route_details.length > 0) { Remove this code Then remove the closing bracket for the if statement, which again if you are using the default file will be on line 182. Once you've made the change, save the file and upload to your server, overwriting the existing file. TEST Now when you visit your live flights ACARS map, when you click on an ongoing flight, the route should be displayed in red. I'm going to work on plotting the flown route alongside the planned route next. Cheers, Stuart EXAMPLE: Optional Amend To acarsmap.js I found that when I made the following amends, the plotted line for the flight route stayed on the map. If you want to remove the line when a user clicks the map, you can make the following amend: On this block of code, you will see that the clearPreviousMarkers function call is commented out for the map click event. // They clicked the map google.maps.event.addListener(map, 'click', function() { //clearPreviousMarkers(); }); Just uncomment the function call, so the block of code looks like this: // They clicked the map google.maps.event.addListener(map, 'click', function() { clearPreviousMarkers(); }); Another Optional Edit - acarsmap.js In the example image above you can see that the fix, vor and aircraft icons are sitting above the flight path. This was annoying me, as I think it would be much neater if the icons are centred on the flight path. The reason they are sitting above is because you have to specify an offset for icons when using Google Maps. The offset would be half the icon height, and half the icon width. Please note: If you have changed the default icons, you need to amend the second offset point to half the width and half the height of the icons. So I've made a mod to the acarsmap.js file to include the offset. Step 1: The in-flight directional icon: Find the following code: var pos = new google.maps.LatLng(lat, lng); flightMarkers[flightMarkers.length] = new google.maps.Marker({ position: pos, map: map, icon: url+"/lib/images/inair/"+data[i].heading+".png", flightdetails: data[i], infowindow_content: detailed_bubble }); Replace with this code: var pos = new google.maps.LatLng(lat, lng); var flightpos = new google.maps.MarkerImage("/lib/images/inair/"+data[i].heading+".png", null, new google.maps.Point(0,0), new google.maps.Point(17, 17) ); flightMarkers[flightMarkers.length] = new google.maps.Marker({ position: pos, map: map, icon: flightpos, flightdetails: data[i], infowindow_content: detailed_bubble, zIndex:200 }); This takes care of the in-flight directional icon. Step 2: VOR & FIX Icons Find the following code: var loc = new google.maps.LatLng(nav.lat, nav.lng); if(nav.type == 3) icon = "icon_vor.png"; else icon = "icon_fix.png"; var navpoint_info = tmpl("navpoint_bubble", {nav: nav}); routeMarkers[routeMarkers.length] = new google.maps.Marker({ position: loc, map: map, icon: url + "/lib/images/"+icon, title: nav.title, zIndex: 100, infowindow_content: navpoint_info }); Replace with: var loc = new google.maps.LatLng(nav.lat, nav.lng); if(nav.type == 3) var image = new google.maps.MarkerImage("/lib/images/icon_vor.png", null, new google.maps.Point(0,0), new google.maps.Point(10, 10) ); else var image = new google.maps.MarkerImage("/lib/images/icon_fix.png", null, new google.maps.Point(0,0), new google.maps.Point(10, 10) ); var navpoint_info = tmpl("navpoint_bubble", {nav: nav}); routeMarkers[routeMarkers.length] = new google.maps.Marker({ position: loc, map: map, icon: image, title: nav.title, zIndex: 100, infowindow_content: navpoint_info }); Then save the file and upload to your server. You should now have centred icons along your flight path, as shown below: I think this looks much neater :-) Further edit: I just found that the in-flight directional icon was sitting under the nav and fix icons when they were close together. This is because there is a Z-Index value set for the nav and fix icons but not one set for the other icon. This is an easy fix and I've amended the code on step one of this amend to include it. I just added a Z-Index value for the in-flight icon that is higher than that of the other two icons.
-
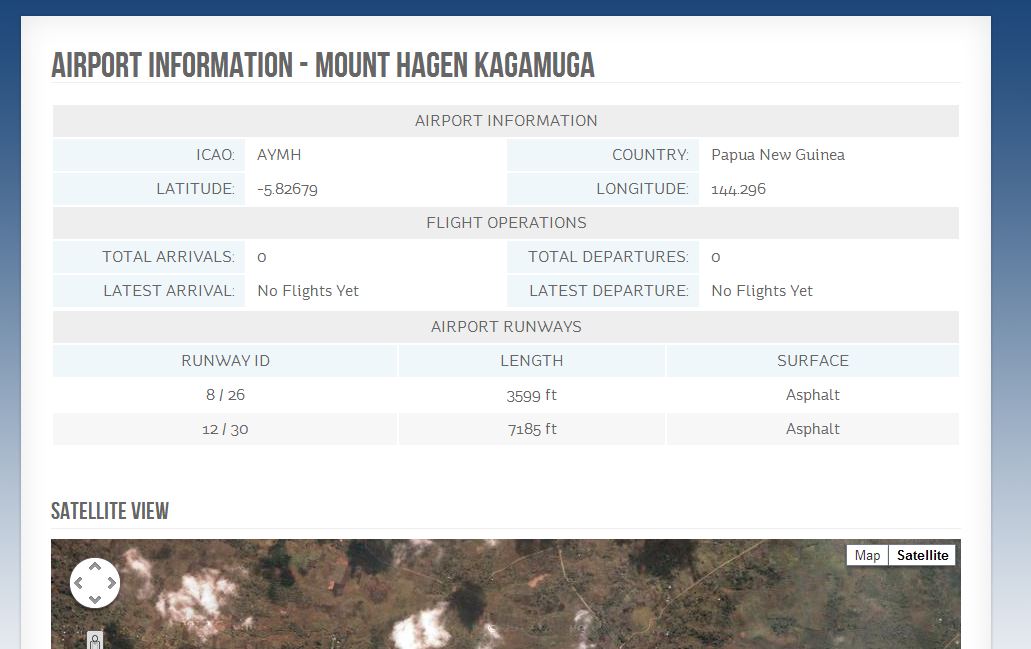
I've been busy with my part time university studies and work, so this project took a back seat for a long time. I started working on it again a couple of days ago though, and have made some progress. I've made the "find airports by country" form pull the data via ajax. A difference from the original. The data I have being used for the module is: Basic Airport Info (ICAO, lat & lng, country) I can add an airport description easily enough. For me, it isn't going to me used, as I have over 30,000 airports in my database, and I can't find a good data source I could use to pull the descriptions from. I'm not going to be manually adding that much data myself, but I will build the description in to the module for anyone to use. Flights info Latest flights from and to the airport, and total arrivals and departures. May expand on this to show most used by pilots etc. Runways Basic info is shown for each runway, including surface, heading, length, width and elevation. It also shows if the runway is lit and the displaced threshold if any. I'm going to be creating a visual representation of the runways for each airport. I lost the work I had done previously so I have to start from scratch on that. Radio Frequencies If the airport has radio, the frequencies will be listed. NOTAMs The four latest NOTAMs will be displayed, if there are any available. METAR The latest METAR will be displayed if available, with a description too. I'm looking around for ILS data I can use, if anyone knows of a reliable data source that's freely available, let me know and I can sort that out. I'm going to be working on this over the next couple of weeks, so don't expect this to be released straight away. Any other suggestions for this module would be welcomed. For a sneak peek at where I am now, and to see how things are progressing, you can visit the airport info pages on my development site: http://aroundtheworl...ex.php/airports Cheers, Stuart I forgot to mention, if you take a look at the work in progress, some of the data for the airports is incomplete in my database. There are over 30,000 airports, and some don't have much data at all. If you come across an airport with little information, odds are that it's not a major airport. Try going for a big international airport instead.
-
What about people viewing on iPads/tablets, laptops, mobiles etc? I've just looked on my iPad and the right stats div overlaps around a third of the page width. It's lazy development if you don't consider the multitude of screen resolutions available and aim to ensure that the site displays correctly on as many devices as possible. I would recommend that you remove the right div, and replace it in the main page layout.
-
Subbed to this thread, and extremely interested in how it progresses! It's a great idea and would be a very welcome add on for phpVMS, in my opinion.
-
You'll find a quick tutorial here: http://www.inetsolution.com/turnleft/post/CSS-Style-Switcher-A-quick-and-dirty-how-to.aspx It shouldn't be difficult to implement this into a phpVMS site.
-
I'm not trying to deter you or anyone, but I believe you have to be realistic. You can't expect to jump into any PHP MVC based system like phpVMS without doing some preparation first. Much in the same way that a pilot cant fly solo until he has the necessary skills to be able to do so. Learning basic HTML, CSS and PHP are the first steps. I fail to see why that statement has insulted you? Its a common problem here on these forums where people download phpVMS, try installing it and then run into problems because they lack the knowledge or experience of the basics. Many here on the forums are prepared to help, but when those struggling start spamming and complaining, then patience can soon be lost, and often is. I don't want to get caught up in an argument with you (or anyone else), but I do stand by what I have said.
-
Some time ago, I released a module that added airport information pages to phpVMS, with the help of some other members. I'm looking to release version 2 within the next month, with more features. One of these I've already sorted out, and that's runway information, as shown below: It's pretty basic at the moment, showing only the runway Idents, surfaces and lengths. I'm going to be adding elevations and whether they have runway lighting or not next. Not sure there is any other data I could include here? I'm also adding NOTAMs and METARS with these ready to drop into the existing scripts. What else would be worth adding though? I could add real world data, such as delays etc. Any suggestion would be welcome at this stage.

-
Just subscribed to PREPAR3D, anyone else using it?
stuartpb replied to stuartpb's topic in Off-Topic Banter
Sorry about not updating sooner, been busy the last week. I've had a few test flights on the sim, and ended up un-installing it. Performance was worse on P3D than it was with FSX. I ran a flight on P3D and on FSX, with both on the same settings for the visuals and the FPS came in at 2-3 FPS lower for P3D average, and some nasty spike drops too. I never took any screenshots while I was doing so, as I was short on time. I may run some more tests but I'll need a day to do it properly, and I'll need to reinstall P3D too. I was pretty gutted to be honest. Another thing that instantly bugged me is the fact that every time you start P3D, it loads into a flight and there is no front end menu like with FSX. I'll post up again if I decide to give it another go. My rig specs are as follows: CPU: Core i7 920 Mobo: Asus P6T RAM: 16GB DDR3-2000 GPU: Sapphire HD6870 1GB VRAM Audio: Asus Xonar Essence II 2x 500GB HDDs in RAID 0 + 1x 500GB SSD 750w PSU 2x Custom WC Loops -
Let's clear a few things up. Firstly, I wasn't being rude, nor do I think I am better than anyone else because I happen to know a few lines of code as you put it. I learned web development by practising and reading, the same way almost every other developer learns. Your opening of several threads for the same problem, and trying to veil it with c**k-eyed excuses lead me to post what I did. You may have narked those who could have probably helped you the most by doing so, to the point where they cannot be bothered to help you. You also seem to be ignoring the fact that this is a community based project, where we all have day jobs and family to keep (including Nabeel), and we will offer assistance as often as we feel comfortable with, or are able to do so. You are acting like a kid in a sweet shop, stamping your feet because you can't have a lolly. Secondly, downloading and installing phpVMS demands that you have some prerequisite knowledge. If people can't be bothered to ensure they have that knowledge before attempting to install phpVMS, then why should they expect help? It's that simple. You are a prime case. Have you contacted your webhosts to see if the problem is anything they can assist with? Have you tried tracing the problem by means of the error messages and logs? Have you explored the resources already available on this forum and also all over the internet? Judging by your incessant posting, I would guess not. For your reference, here are a few examples: http://stackoverflow.com/ http://www.w3schools.com/php/default.asp http://www.homeandlearn.co.uk/php/php.html http://www.goodphptutorials.com/ http://webdesign.about.com/od/servers/Web_Server_Management_.htm This short list is by no means exhaustive! You say (in another thread) that you want you want to show others how to use and modify phpVMS, but how can you teach anyone if they don't already have the basics in HTML, CSS and PHP? That would be an extremely difficult task, even for the best teachers out there. Also bear in mind that servers can come in many different configurations so providing a one video to cure em all tutorial would be impracticable. I enjoy helping out where I can with other members, but as soon as people start spamming, and complaining about phpVMS, I dig my heels in and refuse to help. Why should I or anyone else jump to your beck and call? That is how you have come across, to me at least, and I suggest YOU have a good think about it.
-
I stand by what I said. Skinning up a phpVMS website, and also modifying it, demands that the person attempting to do so has a basic grasp of HTML, CSS and PHP. As I said, there are thousands of resources available out there which can assist those who lack that basic grounding. If you want to take that as me being rude, then that's yor prerogative. I've only been back on these forums a short while, but I've noticed you spamming, opening new threads constantly for the same problem. This forum is built on hobbyists who enjoy using phpVMS, and like to offer help where they can. You cannot expect people to rush to your assistance, like this is a commercial product with a dedicated support team. Have some patience, take advantage of the down time and do some reading on the basics. Not everyone has the skills, but everyone has the potential to learn the skills, something that can often be forgotten when it comes to problem solving.